How to Layout Articles Using PyMuPDF’s Story Feature - Part 2
Harald Lieder·November 28, 2022

This article is part of a series on the functionality of PyMuPDF.
PyMuPDF is a Python binding for MuPDF – a lightweight PDF, XPS, eBook viewer, renderer, and toolkit. Both PyMuPDF and MuPDF are maintained and developed by Artifex Software, Inc.
PyMuPDF can access files in PDF, XPS, OpenXPS, CBZ, MOBI, EPUB, and FB2 (eBooks) formats, and it is known for its top performance and high rendering quality.
PyMuPDF’s homepage is on Github. It can be installed from PyPI via "pip install pymupdf".
The ‘Story’ Concept at Work
This is a continuation of an earlier article introducing the basic concepts of (Py-) MuPDF’s “Story” layout technique.
If you have not yet, we strongly recommend reading that article for a better background understanding of what we will be discussing here.
We will present a script with a GUI (Graphical User Interface) that lets its user interactively compose an article, using text and images.
Under the user’s visual control, images can be placed anywhere on PDF pages, rectangles can be defined where the article’s text should be written into, flowing around areas reserved for images.
Pages can be added or deleted.
At any time, a layout process can be started, and the user is immediately able to see, how things have worked out – “WYSIWYG”.
When everything looks good, the PDF can be saved.
In addition, or alternatively, the user may generate a Python script, which when executed, will produce the same PDF as was displayed. This option may be useful if functionality is required that is not offered by the dialog. It is also possible to embed all images in the script’s source so it can be ported to environments where the images do not exist.
When required, text rectangles can be modified, image positions and sizes can be changed, or a different font size for the text can be chosen – or even the HTML text file can be replaced or edited.
By pressing a button on the window, the PDF’s pages are cleared for another run of the layout.
Here are the details of this process.
Executing the Script
Like every Python script, use a command like this one to start it:
python3 gui-pystory.py
What you will see next is a “file picker” dialog:
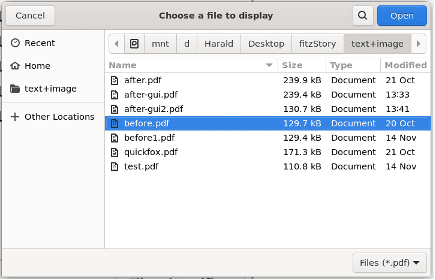
Either choose an existing file like indicated and click Open or click Cancel.
In case of Cancel a new file with three empty pages is presented, otherwise the chosen PDF is displayed.
We will assume for now, that you have decided to create a new PDF.
We will take an article’s text and a set of four images and design our layout with this material.
Window Description
The window is divided into two parts. On the right side, you’ll find the Display Panel, this is where the content of the PDF pages is displayed. At the top, you will find forward and backward buttons and page number information. You can use the mouse wheel to scroll through the file’s pages. Entering a page number and pressing Enter will directly jump to that page.
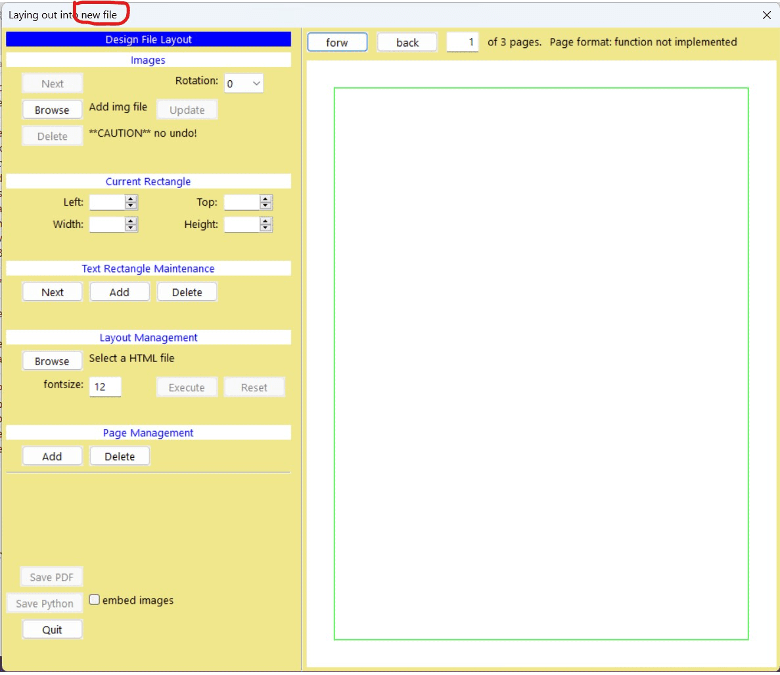
On the left side, you’ll find the Design Panel, which shows various controls grouped by function:
Top Group: Images
- Next: A button to sequentially select images contained on this page. A selected image receives a red border and can then be modified. If an image is selected, its coordinates (next group) are shown. The red rectangle can be grabbed and moved while the left mouse button is held down. The mouse cursor shows a “hand” symbol (👆) when this is possible. The top-left and the bottom-right corner of the rectangle can be used to change the rectangle’s size. The mouse pointer changes to a “cross” symbol (➕) when this is possible.
- Rotation: Shows or changes the image’s rotation (multiples of 90° only).
- Browse: Click this button if you want to load and insert an image from a file. This opens a “file picker” dialog like before, to let you choose from your file system. The image will be shown in the upper left corner of the Display Panel and will automatically be selected. Move it to the desired location.
- Update: While moving/changing an image’s rectangle (including its rotation), the image itself will not immediately be moved. This would slow down the cursor operation too much. Instead, you must press the Update button once you are finished with an image. The display will then be refreshed, and the image will snap to its new location.
- Delete: Deletes the selected image.
Let us select and insert our first image:
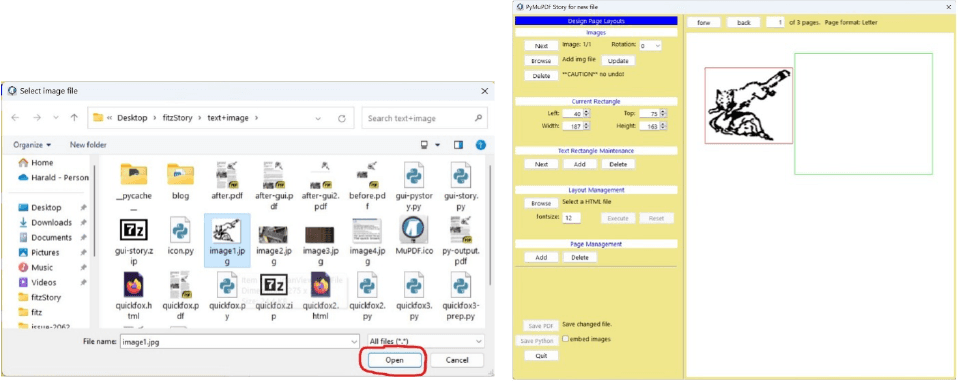
The left picture shows the image file picker. After clicking on Open and moving the image to its desired place, the result will look like the right picture. Please also note how we have adjusted our first text rectangle to the right of that image.
Second Group: Current Rectangle
While an image rectangle is selected, its coordinates are displayed here. Fields Left, Top, Width and Height are modifiable and can be used for fine controlling coordinates (if mouse movements are too imprecise) with the small arrows.
In the same way, the fields in this group are also used for text rectangles (see below).
Only text rectangles are eligible places for text.
- Next: Select the (first or next) text rectangle. Iterates through existing rectangles in sequence of their creation. The selected rectangle receives a red border, other rectangles are displayed with green borders. Any previously selected (red bordered) object (image or text) loses focus. Text rectangles can be modified, moved around, etc. in the same way as images.
- Add: Creates (and selects) a new text rectangle. Like a new image, it will be placed near the top-left corner of the displayed page. The sequence of rectangle creation is left to your discretion: executing the story will automatically rearrange them.
- Delete: Deletes the selected rectangle.
Text rectangles are always displayed. For every page, there initially exists at least one rectangle, which is the full page (minus a border of 0.5 inches, 36 points).
However, a page need not have text rectangles at all: the initial one may be deleted. In that case the page will not receive text at all.
Fourth Group: Layout Management
In this section, you will select the HTML file, that contains the actual text of your article. Another button causes the text to be distributed on the pages of the file. If you are not satisfied with the result, you can roll back, make any changes, and resume the layout.
- Browse: Read the article’s text to prepare it for the output. Another “file picker” dialog will be shown to select the desired file in your file system. The name of the chosen file will be displayed as a reference.
- fontsize: Changes the font size of the text. This influences the space needed for text and can thus be used for layout optimization.
- Execute: Executes the story and fills the text rectangles. When done (execution time: fractions of a second), the content in the Display Panel is automatically refreshed with the result.
- If the text did not fit, new pages will automatically have been appended.
- Text rectangles continue to be visible (green borders).
- Unwanted overlaps or gaps can now be corrected by adjusting rectangles or images appropriately.
- The HTML file can be replaced or refreshed if desired.
If you think you need to change something, press the following button:
- Reset: Removes all text from all pages, such that only text rectangle borders and images are left. Once you have made your changes, press Execute again.
Fifth Group: Page Management
- Add: Adds an empty page (having one default text rectangle) following the current one.
- Delete: Deletes the current page.
Last Group: File and Dialog Control
- Save PDF: Save the file in its current state (WYSIWYG). An appropriate dialog is displayed to let you choose the desired location in your file system.
- Save Python: Save a Python script. An appropriate dialog is displayed to let you choose the desired location in your file system. Executing this generated program will produce the same PDF as displayed. Use this option if features are needed that are not offered by the dialog – like generating a table of contents – or simply for persisting the design effort.
- embed images: Clicking this check box includes all images in the source code of the generated script. This allows execution in environments where the images are not available. Should also be used if the GUI was started with an existing file having images.
- Quit: Close the GUI window and end the script. The same happens by pressing the Escape key or by clicking the top right (✕) window symbol. Any unsaved work will be lost without warning.
Reading Text and Painting the Page Layouts
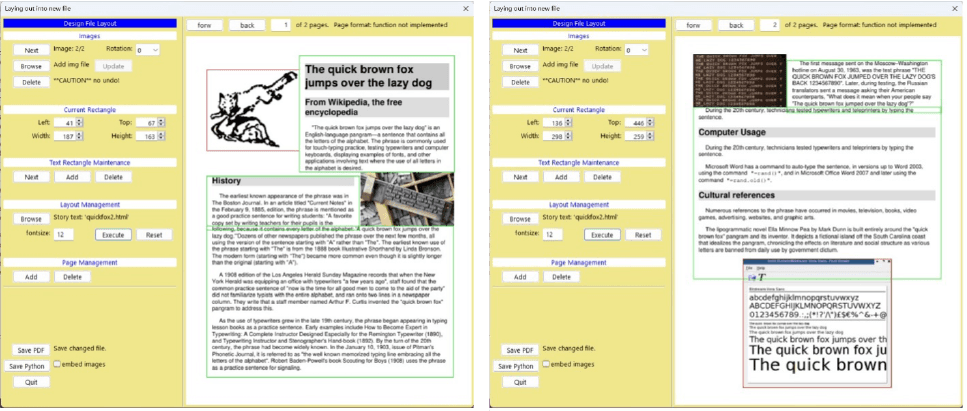
Here is how our PDF may look like after executing the following steps:
- Inserted/placed images
- Defined and shaped text rectangles around the images
- Selected the HTML with our text (note the filename “quickfox2.html”)
- Pressed the Execute button
Please also note the red rectangles: their size and position information are contained in the rectangle group on the left panel sides.
We have also removed the third page as it was not required.
Changing Underlying Text
This may be a good time to consider alternatives for the underlying text.
You can change the current text using your local HTML text editor, or you may want to even try out a whole different file version.
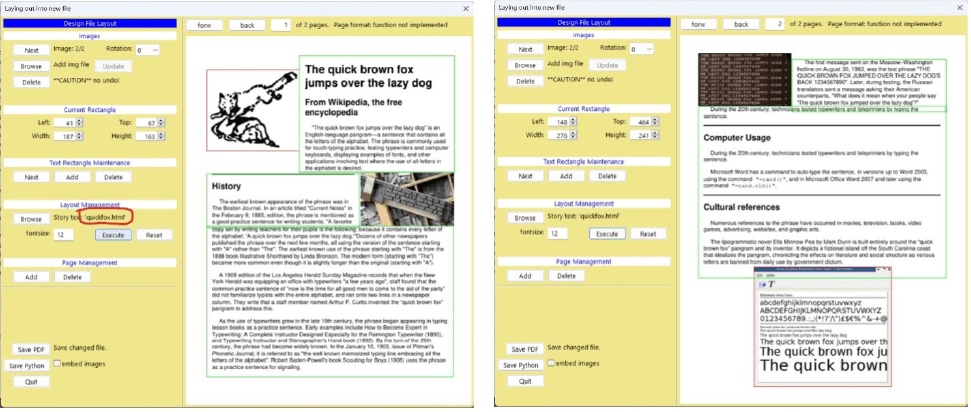
The following screens show what happened after choosing a different HTML (please note the file name circled red). This version uses horizontal lines between text headers instead of a gray background. This has changed text space requirements and we thus have adjusted some text rectangles a bit:
Indeed, not bad for the first time through – we can now save our work.
As mentioned above, we can directly save to a file – Save PDF – or to a program – Save Python – or both.
If the generated program is being executed, it will generate the same PDF as the GUI.
Conclusion
In this article, we have shown a way to use PyMuPDF’s Story feature to interactively create articles by combining images and HTML-styled text.
It demonstrates how professional layout applications can benefit from (Py-) MuPDF technology.
The unique approach of generating a program as part of the layout process makes the interactive work reusable and extendable with additional features.
PyMuPDF is a large, full-featured document-handling Python package. Apart from its superior performance and top rendering quality, it is also known for its excellent documentation: the PDF version today has over 420 pages in Letter format — more than 70 of which are devoted to recipes in How-To format — certainly a worthwhile read.
Another knowledge source is the utilities repository. Whatever you plan to do when dealing with PDFs: you will probably find some example script there that gives you a start.
If you have questions about PyMuPDF, you can reach the devs on the #pymupdf Discord channel.
Related PyMuPDF Articles
PyMuPDF’s New ‘Story’ Feature Provides Advanced PDF Layout Styling
Discuss This Article with the Community
Have a question, a different approach, or something you built after reading this? Share it on the forum or join the Discord, we'd love to hear from you.