Advanced Text Manipulation Using PyMuPDF
Harald Lieder·July 19, 2022
This is the second article on the text handling capabilities of PyMuPDF. Please find the first article here. It deals with various aspects of text extraction, and its typical uses, including OCR.
PyMuPDF’s (and MuPDF’s) capabilities in this area are available for all supported document types. So, apart from the omnipresent PDF format, (Open) XPS, EPUB, HTML, Fiction Book, and Comic Book are also supported.
In this article, we focus on some more advanced topics:
- Searching for text strings (all document types)
- Highlighting text (PDF only)
- Searching for highlighted text (PDF only)
- Text manipulation (PDF only)
Before we begin, let me summarize PyMuPDF’s characteristics.
PyMuPDF …
- is a product owned and maintained by Artifex. It is available under an open source, freeware license (GNU AGPL 3.0), as well as a commercial license,
- is a Python programming library, which provides convenient access (Python bindings) to the C library MuPDF, also owned and maintained by Artifex under the same license models,
- has its homepage on Github and can be installed from PyPI,
- supports many (if not most) of MuPDF’s functions — text extraction and manipulation is just one among a plethora of other features. The Github website will give you a good overview.
Searching for Text
Searching for a specified text string is supported for all document types. The basic format of the method is as simple as it could be:
result = page.search_for("needle")
Here, “page” is a Page object created from a Document object via page = doc.load_page(page_number).
The method looks for all occurrences of string “needle” on the page and returns each hit location as an item in the Python list “result”. A “location” is a rectangle given by the coordinates of its top-left and its bottom-right point.
Note
Do not confuse the term “rectangle” with the same-named notion in geometry: A rectangle in document management is always axis-aligned: The top and bottom sides are parallel to the x-axis, and the left and right sides are parallel to the y-axis. So there is no rectangle with a 30° rotation angle relative to the x-axis. General geometrical objects with four corners are called “tetragons” or “quadruples” in document management.
To find all occurrences of string “pymupdf” on **page 9** of PyMuPDF’s documentation, you could do this:
In [1]: import pymupdf
In [2]: doc = pymupdf.open("PyMuPDF.pdf")
In [3]: page = doc[8] # this is 0-based!
In [4]: page.search_for("pymupdf")
Out[4]:
[Rect(72.0, 361.02, 117.38, 375.55),
  Rect(93.85, 493.15, 136.48, 506.46),
  Rect(72.0, 523.04, 114.63, 536.35),
  Rect(72.0, 552.98, 114.63, 566.24),
  Rect(72.0, 582.82, 114.63, 596.13),
  Rect(165.44, 618.68, 208.08, 631.99)]
In [5]: # Note: numbers are rounded for better readabilityIf “needle” does not occur on the page at all, an empty list “[]” will be returned.
The search algorithm is case in-sensitive: it will find “PYMUPDF”, “PyMuPDF” and “pymupdf”.
The “needle” string may contain spaces and may extend across multiple lines. Hyphenated needles are also found: the method will deliver two rectangles, covering “Py-” resp. “MuPDF”, for the needle “pymupdf”, when these text parts are on separate lines.
Interpret above output like this:
The first result item Rect(72.0, 361.02, 117.38, 375.55) is a rectangle with the points top-left = Point(72.0, 361.02) and bottom-right = Point(117.38, 375.55) .
What can you do with the search results?
The most frequent uses we have seen, are either highlighting /underlining the hit locations, or permanently replacing, resp. deleting the identified text.
The next sections explain how this works.
Highlighting Text
Highlighting in PDF means applying a visual effect similar to a text marker: the text is being given a rectangular background in some prominent color (yellow, pink, etc.). The PDF specification calls these text marking objects “annotations”.
Again in PyMuPDF, this task can be carried out in the most elegant and intuitive way:
In [1]: import pymupdf
In [2]: doc = pymupdf.open("PyMuPDF.pdf")
In [3]: page = doc[8]
In [4]: for rect in page.search_for("pymupdf"):
   ...: page.add_highlight_annot(rect)
In [5]: # DONE!In exactly the same way you can underline or strike out the text — just use page.add_underline_annot(rect) resp. page.add_strikeout_annot(rect) .
You may want to have a look at PyMuPDF’s examples repository to see, how to accomplish more complex text marking cases.
Searching for Highlighted Text
You can also find and extract text that already has been highlighted:
A PyMuPDF Page object has an iterator that steps through its annotations, Page.annots(). For each annotation yielded by this iterator, take the annotation's rectangle and extract the text covered by it.
In [1]: import pymupdf
In [2]: doc = pymupdf.open("PyMuPDF.pdf")
In [3]: page = doc[8]
In [4]: for r in page.search_for("pymupdf"): # add demo highlights 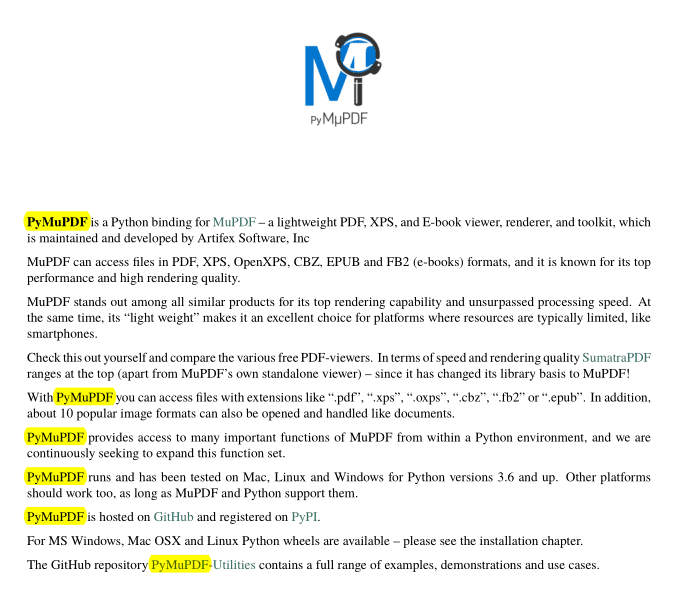
In [5]: for annot in page.annots(): # read the text covered by a highlight
   ...: if annot.type[0] == pymupdf.PDF_ANNOT_HIGHLIGHT:
   ...: print(f"highlighted:
'{page.get_textbox(annot.rect)}'")
highlighted: 'PyMuPDF '
highlighted: ' PyMuPDF '
highlighted: 'PyMuPDF'
highlighted: 'PyMuPDF'
highlighted: 'PyMuPDF '
highlighted: ' PyMuPDF'Note
In the above you will observe occasional spaces before or after the extracted text. These are caused by the fact that highlights are no true rectangles: their left and right borders are curves, no straight lines. So, depending on the font size and the word position within the text, neighboring spaces may be extracted as well.
Redacting Text
If your PDF contains sensitive information, that must be protected against unauthorized access (without necessarily locking away the complete document), PDF ”Redaction Annotations” come into play.
For example, it is not sufficient to simply draw a black rectangle over the delinquent’s name in a legal document. Doing just this would leave the sensitive information in the file: it could still be extracted by a program like PyMuPDF.
Instead confidential information must be physically removed from the file altogether. Project x-ray uses PyMuPDF to find badly done anonymizations in legal documents. Here is what this project has to say about PyMuPDF:
“Under the covers, xray uses the high-performant PyMuPDF project to parse PDFs. It has been a wonderful project to work with.”
Physical replacement or removal of unwanted information is one of the possible uses of PDF redaction annotations.
Once again, it couldn’t be easier to implement this than using PyMuPDF:
In [1]: import pymupdf
In [2]: doc = pymupdf.open("PyMuPDF.pdf")
In [3]: page = doc[8]
In [4]: # find and mark every occurrence of "pymupdf" as "to be deleted"
In [5]: for rect in page.search_for("pymupdf"):
   ...: page.add_redact_annot(rect) # mark as "remove this"
In [6]: page.apply_redactions() # apply all redactions on page
Out[6]: True
In [7]: # search again to confirm that "pymupdf" is really gone:
In [8]: page.search_for("pymupdf")
Out[8]: []
In [9]: # Indeed!The page will now display black rectangles wherever the needle has been removed.
Wrapping Up
I hope you enjoyed this second article about PyMuPDF.
PyMuPDF is a large, full-featured document-handling Python package. Apart from its superior performance and top rendering quality, it is also known for its excellent documentation: the PDF version today has over 420 pages in Letter format — more than 70 of which are devoted to recipes in How-To format — certainly a worthwhile read.
Another knowledge source is the utilities repository. Whatever you plan to do when dealing with PDFs: you will probably find some example script there that gives you a start.
Related PyMuPDF Articles
PyMuPDF's New Story Feature Provides Advanced PDF Layout Styling
Discuss This Article with the Community
Have a question, a different approach, or something you built after reading this? Share it on the forum or join the Discord, we'd love to hear from you.