Extracting and Creating Vector Graphics in a PDF Using PyMuPDF
Harald Lieder·May 16, 2023
This article is part of a series on the functionality of PyMuPDF.
PyMuPDF is a Python binding for MuPDF — a lightweight PDF, XPS, and E-book viewer, renderer, and toolkit. Both, PyMuPDF and MuPDF are maintained and developed by Artifex Software, Inc.
PyMuPDF can access files in PDF, XPS, OpenXPS, CBZ, MOBI, EPUB and FB2 (e-books) formats, and it is known for its top performance and high rendering quality.
PyMuPDF’s homepage is on Github. It can be installed from PyPI via pip install pymupdf.
Create Line Art on PDF Pages
PDFs and other document types are able to not only render text and display embedded images, but they also can directly draw elementary graphical elements like lines, curves and their composites like rectangles and arbitrary other geometrical elements. These objects are collectively called “line art”.
They are often used for visualizing data via Gantt charts, block diagrams or pie charts. These types of graphics have advantages over embedded images: Line art is fast to render, has no overhead as incurred with displaying embedded images and — being vector graphical elements — can be zoomed into without blurring, just as is the case with text.
Similar to writing text to PDF pages, PyMuPDF can also draw line art on PDF pages and it supports a number of drawing primitives for this: draw_line(), draw_polyline(), draw_rect(), draw_quad(), draw_bezier(), draw_circle(), and several more. All of these drawing primitives can be interconnected to arbitrary complexity.
These draw methods are defined in a helper class called Shape (similar to what is occasionally called “canvas”).
A shape in essence is a string containing commands that define the drawing primitives in PDF’s mini-language.
Every draw_*() method appends a string to the shape. To finalize a number of interconnected draw commands, the finish() method of the shape must be called. It “closes” the current path, giving it some common properties like stroke and fill colors, line width, dashing patterns, opacity and more.
After a finish(), more draw_*() methods with their corresponding finish() may follow using the same shape string.
Once a shape is considered complete, it must be written (“committed”) to its owning page. At this point the programmer can decide whether the page should render the shape before (overlay=False) or after everything else on the page — in other words whether to put it in foreground or background.
The following snippet explains the basic coding approach:
shape = page.new_shape()  # define the shape for a PDF page
# start drawing commands (i.e. start a "path"), for example
shape.draw_rect(rect)
shape.draw_line(point1, point2)
shape.draw_circle(center, radius)
# ... etc.
shape.finish(width=1.5, fill=fill_color, ...)  # finish the path

# start a second path:
shape.draw_...
shape.draw_...
...
shape.finish()  # finish second path

# commit the shape to the page
shape.commit(overlay=True) # put in foregroundExtract Line Art from Any Page
Vice versa, PyMuPDF can also be used to extract a page’s vector graphics and return it as a list of dictionaries via method page.get_drawings(). Each item of this list represents a “path” — interconnected lines and curves as above, with shared properties like dashing, opacity, stroke and fill colors and more.
The design of the path dictionaries has been chosen to comply with the attributes of the Shape class, so it is easy to recreate one page’s line art on another new page.
Here is an example for a page with one simple path, that draws a red-bordered yellow rectangle, crossed-out by red lines:
In [1]: import pymupdf
In [2]: doc = pymupdf.open()  # open new empty PDF
In [3]: page = doc.new_page()  # make a new page
In [4]: rect = pymupdf.Rect(100, 100, 200, 200)  # define a square
In [5]: shape = page.new_shape()  # define shape for the page
In [6]: shape.draw_rect(rect)  # draw the rectangle
In [7]: shape.draw_line(rect.bl, rect.tr)  # line btm left to top right
In [8]: shape.draw_line(rect.br, rect.tl)  # line btm right to top left
In [9]: shape.finish(  # finish the path
   ...: width=1.5,  # line thickness
   ...: color=pymupdf.pdfcolor["red"],  # border color
   ...: fill=pymupdf.pdfcolor["yellow"],  # fill color
   ...: )
In [10]: shape.commit()  # store on the page
In [11]: doc.save("output.pdf")  # save the new PDF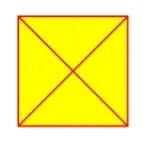
The resulting vector graphic looks like this.
Now we recycle the new file and extract our line art on first page to confirm equality:
In [12]: doc = pymupdf.open("output.pdf")  # re-open PDF
In [13]: page = doc[0]  # first page
In [14]: page.get_drawings()  # extract its drawings
Out[14]:
[{
'items': [  # draw commands are here
  ('re', Rect(100.0, 100.0, 200.0, 200.0), 1),  # rect from above
  ('l', Point(100.0, 200.0), Point(200.0, 100.0)),  # first line
  ('l', Point(200.0, 200.0), Point(100.0, 100.0)),  # second line
],
'closePath': True,  # whether to connect first & last points
'type': 'fs',  # a fill & stroke path
'stroke_opacity': 1.0,  # no border opacity
'color': (1.0, 0.0, 0.0),  # border color
'width': 1.5,  # line width
'lineCap': (0, 0, 0),  # line end format
'lineJoin': 0.0,  # line join format
'dashes': '[] 0',  # line dashing pattern
'rect': Rect(100.0, 100.0, 200.0, 200.0),  # the original rectangle
'seqno': 1,  # first rendering action on page
'even_odd': False,  # how intersecting areas are colored
'fill_opacity': 1.0,  # no fill opacity
'fill': (1.0, 1.0, 0.0),  # fill color yellow
}]
Re-Producing Line Art on Other Pages
We can then expect that the following code will reproduce line art of a given source page with high fidelity on a target page:
# let "page" be the source page of some input document:

paths = page.get_drawings()  # extract existing drawings

# make a new PDF and a new page in it
outpdf = pymupdf.open()
# give new pages same width / height as source page
outpage = outpdf.new_page(width=page.rect.width, height=page.rect.height)
shape = outpage.new_shape()  # make a drawing canvas for the output page
# --------------------------------------
# loop through the paths and draw them
# --------------------------------------
for path in paths:
    # ------------------------------------
    # draw each entry of the 'items' list
    # ------------------------------------
    for item in path["items"]:  # these are the draw commands
        # treat each of them accordingly ...
        if item[0] == "l":  # line
            shape.draw_line(item[1], item[2])
        elif item[0] == "re":  # rectangle
            shape.draw_rect(item[1])
        elif item[0] == "qu":  # quad
            shape.draw_quad(item[1])
        elif item[0] == "c":  # curve
            shape.draw_bezier(item[1], item[2], item[3], item[4])
        else:
            raise ValueError("unhandled drawing", item) # should not happen
    # ----------------------------------------------------------
    # all items are drawn, now apply the geneal path properties
    # ----------------------------------------------------------
    shape.finish(
        fill=path["fill"],  # fill color
        color=path["color"],  # line color
        dashes=path["dashes"],  # line dashing
        even_odd=path.get("even_odd", True),  # control color of overlaps
        closePath=path["closePath"],  # whether to connect last and first point
        lineJoin=path["lineJoin"],  # how line joins should look like
        lineCap=max(path["lineCap"]),  # how line ends should look like
        width=path["width"],  # line width
        stroke_opacity=path.get("stroke_opacity", 1),  # same value for both
        fill_opacity=path.get("fill_opacity", 1),  # opacity parameters
        )
# all paths processed - commit the shape to its page
shape.commit()
outpdf.save("reproduced-drawings.pdf")Conclusion
Admittedly, interpreting vector graphics can be challenging. While each path comes with a rectangle that envelops all of its elementary draw commands, it may still be unclear (and programmatically impossible to determine) which paths belong together and actually are part of a larger figure.
On the other hand, an example like interpreting a table’s content is much easier if gridlines can be extracted that separate the table cells.
PyMuPDF is a large, full-featured document-handling Python package. Apart from its superior performance and top rendering quality, it is also known for its excellent documentation: the PDF version today has over 420 pages in Letter format — more than 70 of which are devoted to recipes in How-To format — certainly a worthwhile read.
Another knowledge source is the utilities repository. Whatever you plan to do when dealing with PDFs: you will probably find some example script there that gives you a start.
If you have questions about PyMuPDF, you can reach the devs on the #pymupdf Discord channel.
Discuss This Article with the Community
Have a question, a different approach, or something you built after reading this? Share it on the forum or join the Discord, we'd love to hear from you.