Adding Watermarks to PDFs with PyMuPDF: A Complete Guide
Jamie Lemon·June 12, 2025
PDF watermarking is an essential technique for protecting intellectual property, adding branding to documents, and maintaining document security. Whether you're marking confidential business documents, adding your company logo to reports, or protecting creative work, watermarks provide a professional and effective solution.
PyMuPDF stands out as one of the most powerful and efficient Python libraries for PDF manipulation. Unlike other PDF libraries that can be slow or limited in functionality, PyMuPDF offers fast processing, extensive customization options, and excellent support for both text and image watermarks.
In this comprehensive guide, you'll learn everything from basic text watermarking to advanced batch processing techniques, complete with practical code examples you can use immediately in your projects.
Setting Up Your Environment
Getting started with PyMuPDF is straightforward. Install the library using pip:
pip install pymupdfPyMuPDF has minimal dependencies and works across Windows, macOS, and Linux. For image watermarking, you might also want to install Pillow for additional image processing capabilities:
pip install pillowHere are the essential imports you'll need for most watermarking tasks:
import pymupdf
import os
from datetime import datetime
Understanding PDF Watermarks
Before diving into code, it's important to understand the two main types of watermarks you can add to PDFs:
Text Watermarks are perfect for adding copyright notices, confidentiality labels, or dynamic information like timestamps. They're lightweight, customizable, and don't significantly increase file size.
Image Watermarks work well for logos, signatures, or any graphical element that needs to appear on your documents. They provide more visual impact but require careful consideration of file size and positioning.
PyMuPDF uses a coordinate system where (0, 0) represents the top-left corner of each page. Understanding this coordinate system is crucial for precise watermark placement.
Basic Text Watermarking
Let's start with a simple example that adds a "CONFIDENTIAL" watermark to every page of a PDF:
import pymupdf

def add_text_watermark(input_pdf, output_pdf, watermark_text):
    # Open the PDF document
    doc = pymupdf.open(input_pdf)

    for page_num in range(doc.page_count):
        page = doc[page_num]

        # Get page dimensions
        page_rect = page.rect

        # Calculate center position
        x = page_rect.width / 2
        y = page_rect.height / 2

        # Insert text watermark
        page.insert_text(
            (x, y),  # Position
            watermark_text,  # Text
            fontsize=50,
            color=(0.7, 0.7, 0.7),  # Light gray
            rotate=90  # Vertical orientation
        )

    # Save the watermarked PDF
    doc.save(output_pdf)
    doc.close()

# Usage
add_text_watermark("test.pdf", "output.pdf", "CONFIDENTIAL")
This basic function demonstrates the core concepts: opening a document, iterating through pages, calculating positions, and inserting text with custom formatting.
Advanced Text Watermarking
For more sophisticated text watermarks, you can customize fonts, create multi-line watermarks, and add dynamic content:
import pymupdf
import os
from datetime import datetime

def advanced_text_watermark(input_pdf, output_pdf):
    doc = pymupdf.open(input_pdf)

    # Get current timestamp for dynamic watermark
    timestamp = datetime.now().strftime("%Y-%m-%d %H:%M")

    for page_num in range(doc.page_count):
        page = doc[page_num]
        page_rect = page.rect

        # Main watermark text
        main_text = "CONFIDENTIAL"
        page.insert_text(
            (page_rect.width - 100, page_rect.height - 10),
            main_text,
            fontsize=100,
            color=(0.8, 0.2, 0.2),  # Red color
            rotate=90,
            stroke_opacity = 0.5,
            render_mode=1, # outline the font
            fontname="Courier-Bold"  # Bold font
        )

        # Timestamp watermark in corner
        page.insert_text(
            (20, 30),  # top-left corner
            f"Generated: {timestamp}",
            fontsize=10,
            color=(0.5, 0.5, 0.5),
            rotate=0
        )

        # Page number watermark
        page.insert_text(
            (page_rect.width - 100, 30), # top-right corner
            f"Page {page_num + 1} of {doc.page_count}",
            fontsize=10,
            color=(0.5, 0.5, 0.5),
            rotate=0
        )

    doc.save(output_pdf)
    doc.close()

advanced_text_watermark("test.pdf", "output.pdf")This advanced example shows how to add multiple watermarks with different positioning, colors, and content types on each page.
Image Watermarking
Adding image watermarks requires a slightly different approach. Here's how to add a logo or image to your PDFs:
import pymupdf

def add_image_watermark(input_pdf, output_pdf, watermark_image):
    doc = pymupdf.open(input_pdf)

    # create a pixmap from the image
    pixmap = pymupdf.Pixmap(watermark_image)

    for page_num in range(doc.page_count):
        page = doc[page_num]
        page_rect = page.rect

        # Calculate scaling to fit image appropriately
        scale_x = page_rect.width * 0.3 / pixmap.width  # 30% of page width
        scale_y = page_rect.height * 0.3 / pixmap.height  # 30% of page height
        scale = min(scale_x, scale_y)  # Maintain aspect ratio

        # Calculate position (center of page)
        img_width = pixmap.width * scale
        img_height = pixmap.height * scale
        x = (page_rect.width - img_width) / 2
        y = (page_rect.height - img_height) / 2

        # Define the rectangle where image will be placed
        target_rect = pymupdf.Rect(x, y, x + img_width, y + img_height)

        # Insert the pixmap image at the back of the page
        page.insert_image(target_rect, pixmap=pixmap, overlay=False)

    doc.save(output_pdf)
    doc.close()

# Usage
add_image_watermark("test.pdf", "logo_watermarked.pdf", "logo.png")
Note
If you want to add transparency to a watermark image it is recommended to use the Pillow library to prepare your image, or build in the transparency into your PNG graphic. Additionally when you add the watermark with insert_image then the overlay=False parameter definition ensures that the image will be placed behind all other page content.
Watermark Positioning and Layout
Precise positioning is crucial for professional-looking watermarks. Here are common positioning strategies:
import pymupdf

def position_watermarks(input_pdf, output_pdf):
    doc = pymupdf.open(input_pdf)

    positions = {
        'center': lambda rect: (rect.width/2, rect.height/2),
        'bottom_left': lambda rect: (50, rect.height - 50),
        'bottom_right': lambda rect: (rect.width - 150, rect.height - 50),
        'top_left': lambda rect: (50, 50),
        'top_right': lambda rect: (rect.width - 150, 50)
    }

    for page_num in range(doc.page_count):
        page = doc[page_num]
        page_rect = page.rect

        # Add large watermark at center
        center_pos = positions['center'](page_rect)
        page.insert_text(
            center_pos,
            "DRAFT",
            fontsize=60,
            color=(0.9, 0.0, 0.0),
            rotate=0
        )

        # Add small copyright notice in bottom right
        br_pos = positions['bottom_right'](page_rect)
        page.insert_text(
            br_pos,
            "© 2025 Your Company",
            fontsize=12,
            color=(0.4, 0.4, 0.4),
            rotate=0
        )

    doc.save(output_pdf)
    doc.close()

position_watermarks("test.pdf", "output.pdf")
Styling and Visual Effects
Professional watermarks require careful attention to visual styling. Here's how to create polished, subtle watermarks:
import pymupdf

def styled_watermark(input_pdf, output_pdf, watermark_text):
    doc = pymupdf.open(input_pdf)

    for page_num in range(doc.page_count):
        page = doc[page_num]
        page_rect = page.rect

        # Semi-transparent background rectangle
        bg_rect = pymupdf.Rect(
            page_rect.width/2 - 120,
            page_rect.height/2 - 30,
            page_rect.width/2 + 120,
            page_rect.height/2 + 30
        )

        # Add background with border
        page.draw_rect(bg_rect, color=(0.9, 0.9, 0.9), fill=(0.95, 0.95, 0.95), width=1)

        # Add main watermark text
        page.insert_text(
            (page_rect.width/2 - 80, page_rect.height/2 + 5),
            watermark_text,
            fontsize=16,
            color=(0.6, 0.6, 0.6)
        )

        # Add decorative elements
        page.draw_line(
            pymupdf.Point(page_rect.width/2 - 100, page_rect.height/2 - 15),
            pymupdf.Point(page_rect.width/2 + 100, page_rect.height/2 - 15),
            color=(0.7, 0.7, 0.7),
            width=0.5
        )

        page.draw_line(
            pymupdf.Point(page_rect.width/2 - 100, page_rect.height/2 + 15),
            pymupdf.Point(page_rect.width/2 + 100, page_rect.height/2 + 15),
            color=(0.7, 0.7, 0.7),
            width=0.5
        )

    doc.save(output_pdf)
    doc.close()

styled_watermark("test.pdf", "output.pdf", "SAMPLE DOCUMENT")
Rotated Text & Watermarks
Many typical watermarks like to draw large text diagonally across all document pages like so:
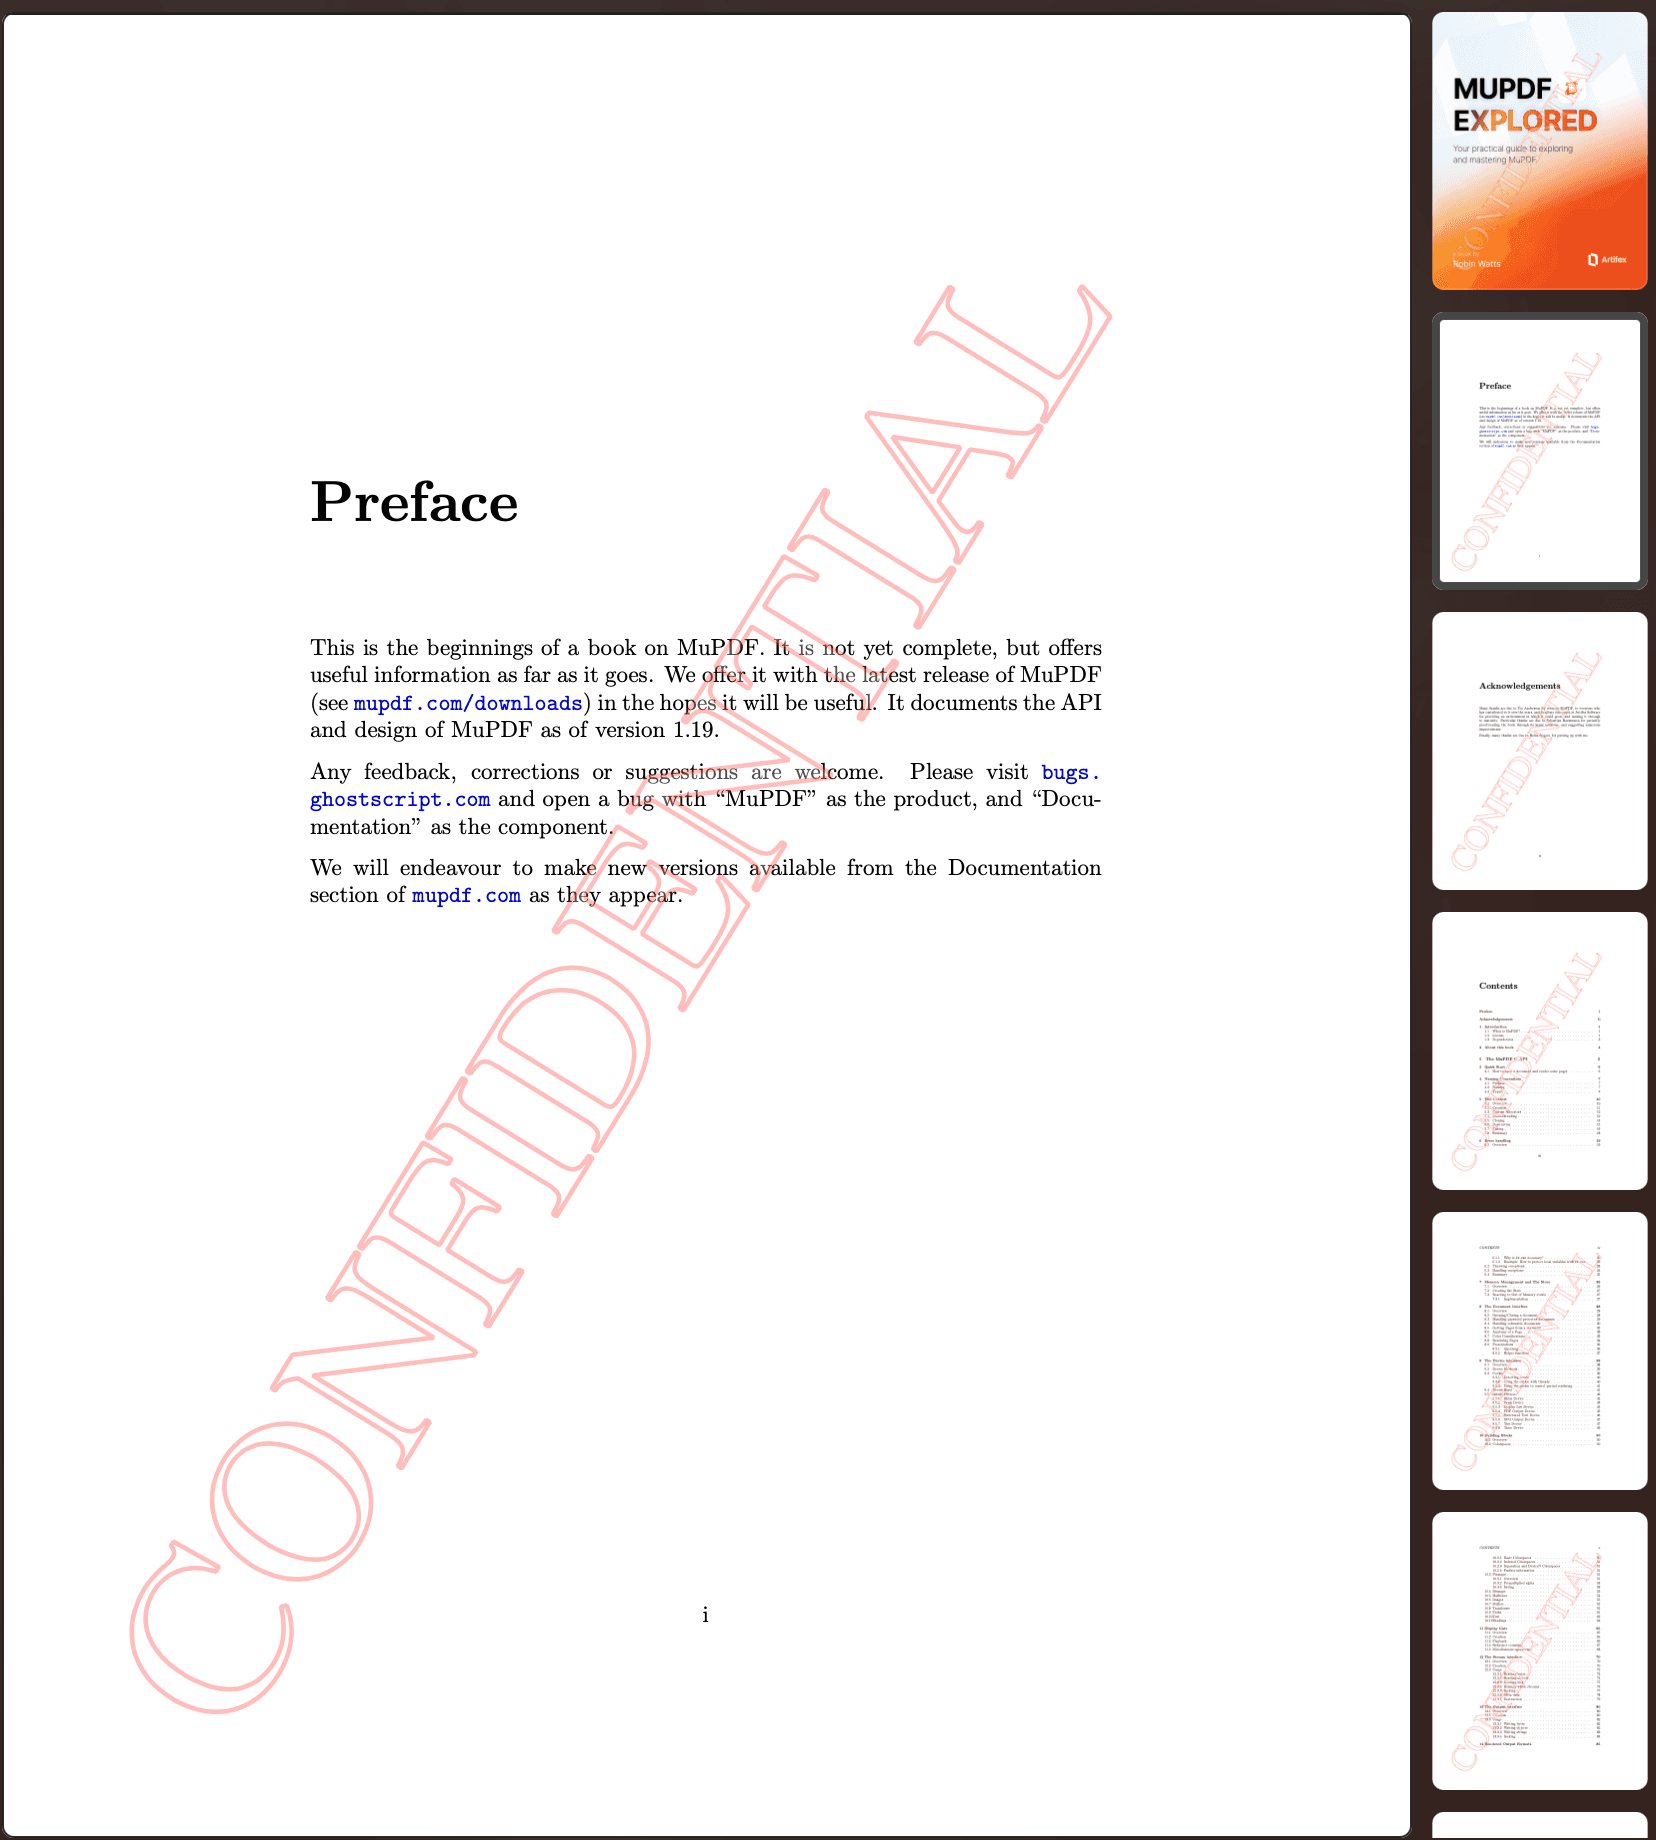
But how do we apply text rotation with PyMuPDF?
Essentially we have to morph the text with a supplied matrix and use some maths follows:
import pymupdf
import math

def add_rotated_text_watermark(input_pdf, output_pdf, watermark_text):
    # Open the PDF document
    doc = pymupdf.open(input_pdf)

    for page_num in range(doc.page_count):
        page = doc[page_num]

        # choose desired font
        font = pymupdf.Font("tiro")
        page.insert_font(fontname="myfont", fontbuffer=font.buffer)
        font_size = 100

        # choose 2 points to define a line along which to insert text
        p1 = pymupdf.Point(100, 750)
        p2 = pymupdf.Point(500, 100)
        # compute angle of line
        cos, sin = (p2 - p1).unit
        theta = math.degrees(math.atan2(sin, cos))
        # define matrix to rotate text
        mat = pymupdf.Matrix(-theta)
        # we want to insert this text along the line
        text = watermark_text #f"This text inserted at {round(-theta,1)}°"
        """
        Optional: Shrink / stretch text to fit along the line
        ---------------------------------------------------------------------
        """
        # length of line
        line_len = abs(p2 - p1)
        text_len = font.text_length(text, fontsize=font_size)
        # scale factor
        scale = line_len / text_len
        # scale matrix
        scale_mat = pymupdf.Matrix(scale, scale)
        # mat *= scale_mat  # (un-)comment to see its effect
        """
        ---------------------------------------------------------------------
        """
        page.insert_text(
            p1,
            text,
            fontsize=font_size,
            fontname="myfont",
            fill_opacity=0.3,
            stroke_opacity=0.3,
            color=(1, 0, 0),
            fill=(1, 1, 1),
            border_width=0.02,
            render_mode=2,
            morph=(p1, mat),
        )
        #page.draw_line(p1, p2, color=(1, 0, 0))

    # Save the watermarked PDF
    doc.save(output_pdf)
    doc.close()

# Usage
add_rotated_text_watermark("sample.pdf", "output.pdf", "CONFIDENTIAL")
Batch Processing Multiple PDFs
When you need to watermark multiple files, batch processing saves time and ensures consistency:
import pymupdf
import os

def batch_watermark_directory(input_dir, output_dir, watermark_text):
    # Create output directory if it doesn't exist
    os.makedirs(output_dir, exist_ok=True)

    # Process all PDF files in the input directory
    pdf_files = [f for f in os.listdir(input_dir) if f.lower().endswith('.pdf')]

    for i, filename in enumerate(pdf_files, 1):
        input_path = os.path.join(input_dir, filename)
        output_filename = f"watermarked_{filename}"
        output_path = os.path.join(output_dir, output_filename)

        try:
            print(f"Processing {i}/{len(pdf_files)}: {filename}")

            doc = pymupdf.open(input_path)

            for page_num in range(doc.page_count):
                page = doc[page_num]
                page_rect = page.rect

                # Add watermark
                page.insert_text(
                    (page_rect.width/2, page_rect.height/2),
                    watermark_text,
                    fontsize=40,
                    color=(0.8, 0.8, 0.8)
                )

            doc.save(output_path)
            doc.close()

            print(f"✓ Successfully processed: {filename}")

        except Exception as e:
            print(f"✗ Error processing {filename}: {str(e)}")
            continue

# Usage
batch_watermark_directory("./input_pdfs", "./watermarked_pdfs", "CONFIDENTIAL")
Error Handling and Edge Cases
Robust error handling ensures your watermarking process works reliably:
import pymupdf
import os

def robust_watermarking(input_pdf, output_pdf, watermark_text):
    try:
        # Check if input file exists
        if not os.path.exists(input_pdf):
            raise FileNotFoundError(f"Input PDF not found: {input_pdf}")

        # Open document with error handling
        doc = pymupdf.open(input_pdf)

        # Check if document is encrypted
        if doc.needs_pass:
            print(f"Warning: {input_pdf} is password protected. Skipping...")
            doc.close()
            return False

        # Check if document has pages
        if doc.page_count == 0:
            print(f"Warning: {input_pdf} has no pages. Skipping...")
            doc.close()
            return False

        for page_num in range(doc.page_count):
            try:
                page = doc[page_num]
                page_rect = page.rect

                # Handle pages with zero dimensions
                if page_rect.width <= 0 or page_rect.height <= 0:
                    print(f"Warning: Page {page_num + 1} has invalid dimensions. Skipping...")
                    continue

                # Add watermark
                page.insert_text(
                    (page_rect.width / 2, page_rect.height / 2),
                    watermark_text,
                    fontsize=min(50, page_rect.width / 10),  # Adaptive font size
                    color=(0.7, 0.7, 0.7),
                    rotate=45
                )

            except Exception as page_error:
                print(f"Error processing page {page_num + 1}: {str(page_error)}")
                continue

        # Save with error handling
        doc.save(output_pdf)
        doc.close()

        print(f"✓ Successfully watermarked: {input_pdf} -> {output_pdf}")
        return True

    except Exception as e:
        print(f"✗ Error watermarking {input_pdf}: {str(e)}")
        return False


robust_watermarking("test.pdf", "output.pdf", "CONFIDENTIAL")
Practical Examples and Use Cases
Here are some real-world applications with complete code examples:
Corporate Document Branding
import pymupdf
import os

def corporate_branding_watermark(input_pdf, output_pdf, company_name, logo_path=None):
    doc = pymupdf.open(input_pdf)

    for page_num in range(doc.page_count):
        page = doc[page_num]
        page_rect = page.rect

        # Company name in header
        page.insert_text(
            (20, 20),
            company_name,
            fontsize=12,
            color=(0.3, 0.3, 0.7),
            fontname="helvetica-bold"
        )

        # Confidentiality notice in footer
        page.insert_text(
            (20, page_rect.height - 20),
            "This document contains confidential and proprietary information.",
            fontsize=8,
            color=(0.5, 0.5, 0.5)
        )

        # Optional logo watermark
        if logo_path and os.path.exists(logo_path):
            try:
                # create a pixmap from the image
                pixmap = pymupdf.Pixmap(logo_path)

                logo_rect = pymupdf.Rect(
                    page_rect.width - 60,
                    10,
                    page_rect.width - 10,
                    60
                )
                page.insert_image(logo_rect, pixmap=pixmap, overlay=False)

            except:
                pass  # Continue without logo if there's an error

    doc.save(output_pdf)
    doc.close()

corporate_branding_watermark("test.pdf", "output.pdf", "Artifex Software Inc.", "logo.png")Best Practices and Tips
When implementing PDF watermarking, follow these best practices for optimal results:
- Choose Appropriate Opacity: Watermarks should be visible but not interfere with document readability. Start with 20-30% opacity for image watermarks and light gray colors for text.
- Consider Document Layout: Position watermarks to avoid covering important content. Test with various document types to ensure consistent placement.
- File Naming Conventions: Use clear, descriptive names for watermarked files. Consider adding timestamps or version numbers.
- Version Control: Keep original files separate from watermarked versions. Consider using a systematic folder structure.
- Testing: Always test watermarking on sample documents before processing important files in batch.
- Performance: For large batches, consider processing files in smaller groups and implementing progress tracking.
- Security: Be mindful that watermarks can be removed by determined individuals. For high-security applications, consider additional protection methods.
Conclusion
PyMuPDF provides a powerful and flexible foundation for PDF watermarking that scales from simple text additions to complex, multi-element branding systems. The library's speed and extensive customization options make it ideal for both one-off watermarking tasks and large-scale batch processing.
The techniques covered in this guide give you the tools to implement professional watermarking solutions for various use cases, from corporate document protection to academic paper drafts. The combination of text and image watermarks, along with proper error handling and optimization, ensures your watermarking system will be both reliable and efficient.
Remember that effective watermarking balances visibility with usability. The goal is to protect and brand your documents while maintaining their professional appearance and readability.
For more advanced PDF manipulation techniques beyond watermarking, explore PyMuPDF's extensive documentation. The library offers capabilities for text extraction, form handling, annotation management, and much more, making it a comprehensive solution for all your PDF processing needs.
Start with the basic examples provided here, then gradually incorporate more advanced features as your requirements grow. With PyMuPDF's robust API and the patterns demonstrated in this guide, you'll be able to create sophisticated PDF watermarking solutions tailored to your specific needs.
Get up to date and get involved - join the PyMuPDF Forum!
Discuss This Article with the Community
Have a question, a different approach, or something you built after reading this? Share it on the forum or join the Discord, we'd love to hear from you.